
Open Graph images. Those little images that show up when your site is shared on social media. The ones for my site were… bad. My default was to use one, huge, boring branded image for everything—which provided no extra value and just cluttered up y’alls feeds (sorry!). I wanted to make them better and here’s what I did.
The Lazy Method
While building a screenshot cloud service for 11ty.dev, it became obvious that I should add an Open Graph size to use screenshots as Open Graph images. You can see this in use on the Eleventy docs pages:
- Navigate to
https://www.11ty.dev/docs/ - With the screenshot service in place, it’s just one line for a custom Open Graph image:
<meta property="og:image" content="https://v1.screenshot.11ty.dev/https%3A%2F%2Fwww.11ty.dev%2Fdocs%2F/opengraph/"> - The social card image looks like this:
For the amount of work this took to setup, it was totally worth it (one <meta>!). But I wanted to take it to the next level for my personal blog (with a long term goal of maybe convincing my colleagues to use something like this on netlify.com 😅).
The Underwhelming Method
In the past, I did experiment a bit with using the SVG to raster image feature of Eleventy Image (via sharp) but it wasn’t quite what I wanted. It had the benefit of being much faster than HTML-based methods (usually based on Puppeteer) but I ended up having to slog through a bunch of hand-written SVG to get it to look how I wanted to look. I’ll admit, I’m not as productive at hand-authoring SVG as I’d like.
The Fancy Method
With those experiences under my belt, I decided to custom design a page on my site (source code) that would iterate over each blog post and could serve as the target for my screenshot service. This provided a couple of benefits:
- I can use all of the existing HTML/CSS/JS/Fonts already in use on my site. That means fake browser chrome, custom Twitter avatars, Lighthouse scores, popularity ranks, among others!
- I don’t have to run Puppeteer locally. I try to avoid this when possible—it is awesome but it slows down the build (a lot).
Each individual blog post has a dedicated Open Graph image page, for example /opengraph/web/automatic-opengraph/ (Fair warning: this page is not using responsive web design principles. It is specifically created for the 1200×630 aspect ratio).
If I want a custom background image for a single post’s open graph image, I add front matter with the image url:
---
seo:
openGraphBackgroundImage: /og/sources/graphpaper.jpg
---
Next, in my base Eleventy layout file (source code) I point the Open Graph page for each specific blog post towards the screenshot service to capture the image:
https://v1.screenshot.11ty.dev/https%3A%2F%2Fwww.zachleat.com%2Fopengraph%2Fweb%2Fautomatic-opengraph%2F/opengraph/_20210830_b/
It looks like this:
I wanted the image to have the post title, my avatar, the published date, and the URL of the page.
For bonus metadata, here’s one with a Lighthouse score attached (updated regularly via Speedlify), a webmentions count, and even the page weight (e.g. 226 KiB, also driven by Speedlify):
Bonus Features
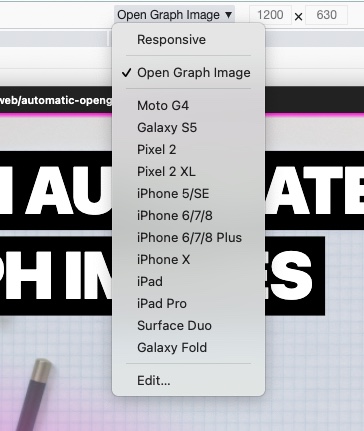
DevTools Device Emulation
Inside of Chrome Devtools, I added a custom Emulated Device specifically for Open Graph image formats to test the layouts.
Social Card Preview
I added a little <details> on the bottom of each blog post so that I could test the social card image preview. I’ll probably pivot this to a link-based sharing widget at some point or combine into my existing Retweet to Share component.
On-demand Builder Cache Busting
The Eleventy Screenshot service is an independent project that uses On-demand Builders to cache screenshot image content to Netlify’s CDN. That cache is pretty sticky. The easiest way to invalidate the cache is to trigger a Screenshot service build on Netlify, but that would reset the cache for all screenshots saved by the service, which is too heavy. It has been a common request for a more granular Netlify API to reset pieces of the cache but during the development of this project I realized that we can handle this manually on the app side using our old friend, the Cache Buster URL.
If the old URL looked like this https://v1.screenshot.11ty.dev/https%3A%2F%2Fwww.zachleat.com%2Fopengraph%2Fweb%2Fcomprehensive-webfonts%2F/opengraph/, I can add an arbitrary cache busting key to the end of it (prefixed by an underscore to identify it anywhere in the URL).
If I generated that key with today’s date (e.g. https://v1.screenshot.11ty.dev/https%3A%2F%2Fwww.zachleat.com%2Fopengraph%2Fweb%2Fcomprehensive-webfonts%2F/opengraph/_20210803/), it would generate new images every day without the screenshot service needing to invalidate the entire cache. (Some related discussion about this on Twitter)